Showing posts with label Sewing. Show all posts

Hoot the Owl

The other day I wanted to make a little stuffed friend for my daughter. She has plenty of stuffed friends, mostly of the store-bought variety. My Amma sent her a sweet stuffed lamb, but since it came over from Iceland I needed to stuff it and sew up the opening. Since I still had quite a bit of a bag of stuffing leftover I started searching Pinterest for easy stuffed friend tutorials. I came across a simple owl and the pattern was titled "Easy" Owl Pattern... easy sounded right up my alley. I used 2 fat quarters, with plenty of fabric leftover and a few scraps I had. I modified the nose shape and eye placement slightly and omitted the feet. It came together very easily and I think I spent maybe 2 hours on it altogether... complete with toddler interruptions. "What are you doing Mommy?" "Is it a surprise for me?" "Ooooo pretty flowers" all while pulling at strings and pins and fabric and scissors.

I really wish I had used stitch witchery for the eyes, sewing around the smallish circles was less than fun for a beginner, but overall it was a fun little project and I'm hoping to make more little friends for her. Visit the link below for the free pattern, I cut the nose in a diamond shape and placed the eyes right up against the upper edge.


Drawstring Treasure Bags

A friend of Kirsten's had a birthday party last month, and I happened to know that he is rather fond of dinosaurs. So I got him some big dinosaurs, but I also got him a pack of 24 mini-dinosaurs all about an inch long or so. I figured they'd be perfect to play with at home or doctor appointments, but was worried it'd be relatively easy to lose track of all those little guys.

I grabbed a pair of my husband's old Levi's that had gotten too worn at the knees and hem and had ended up in the scrap fabric box in my closet. I cut a generous section from the calf area and quite liked the outer seam and wanted to incorporate it into the bag still. I used that as the bottom edge and initially sewed up the bag using just the denim fabric. Well, it didn't gather very well at the top so it didn't draw tight and keep closed. So, I sewed a bit of cotton fabric to the top and added the drawstring pocket in that material, after which it closed nicely. I have an embroidery machine so I added his name to the front of the bag in a dark green before sewing it all together. The drawstring is just a new shoelace. His will fit all the small dinosaurs and a few big ones too, or a handful of cars or small books. Whatever treasures he cares to put in it.

After I made one for her friend, I stitched up one for my daughter too, just a little smaller and filled it with a matching set of dinosaurs. Hers is a knit fabric, so I first sewed the bottom shut, since that's the edge that will stretch, then sewed up the sides and then sewed a little pocket at the top.  Again, I used a shoelace for the drawstring. The nice thing about using a shoelace is, thanks to the aglets at the tips, it won't fray. There are tons of drawstring bag tutorials online, here's a whole page of them at Sew Mama Sew. I just looked at a few, then did my own thing.  One tip is to pin a safety pin at the end of your drawstring to work it through your pocket, much easier to get it through that way.


Ruffled Tablecloth Tutorial

I wanted a simple ruffled tablecloth for my daughter's table, however I found it impossible to find a child's tablecloth, let alone in the right dimensions. Since the legs of the table are a bit marked up I really wanted one that would perfectly skim the floor. So, I did what every other insane person with no sewing skills would do... I made one.

Ruffled Tablecloth Tutorial | Candy Hearts & Paper Flowers


If you know how to sew you may want to skip my ramblings, since you probably have the tools to round the edges and a better way to ruffle the tablecloth. This was just my method with minimal sewing tools, a machine and a pair of scissors and a large handful of pins. Oh and this take a lot of thread, I had to go to the store halfway through my project to get more thread. I realized after typing all this up that I didn't take as many pictures as I thought I did. Hopefully, it's still easy to understand.

Since I had no clue how it would turn out, I didn't want to spend a ton of money on fabric, so I headed to the local hardware store and picked up a paint dropcloth.

I measured across the table in both directions, then added double the height of the table to the floor to each measurement, then since I was adding a 4 inch ruffle, I subtracted 4 inches from both lengths. This gave me a 2 inch margin of error for my seems, if you are an experienced seamstress, subtract 6 inches for a 1 inch margin of error. Then I cut a rectangle that was the total length by the total width. Iron this.

To round the corners, I put the child's table on top of my dining table. I placed the table cloth on it so two adjoining sides just touched the table when pulled taut, then I piled books on top of the child's table so the table cloth wouldn't shift while I was cutting. Starting at one side I just pulled the corner fabric taut down to the dining table and cut the fabric so it skimmed the dining table (floor) until I got all the way around to the adjoining side. I then shifted the tablecloth to an opposite side of the table to do the next corner.

Now measure along the circumference of the table cloth and take that number and multiply by 4 for a nice full ruffle. Cut 5-6" wide strips from the drop cloth, until you get enough to sew together to make the ruffle. I did 6" wide strips, again I wanted a large margin of error for my seams. I trimmed everything up afterwards, next time I would only do 5" for a 4" wide ruffle. I didn't really know what I was doing and wanted to make sure I wasn't messing anything up.

So I sewed the strips together to get 1 long 6" wide strip. Then I ironed the strip, and ironed down 1" edges to get a 4" wide strip. Then I hemmed the edges and trimmed my excess fabric.

Now the crazy part!!! Since I have a super long strip of fabric there is NO way I was going to do the typical ruffling method of a really lose straight stitch and pulling one thread carefully for that much fabric. For sure I'd have broken a thread and ended up very frustrated. So I looked around the internet for a bit for ruffling methods. What I did was very easy, though it required very careful sewing. I was using a heavy-duty thread since I was working with such a thick rough material, so about 3/4" from the top edge of the ruffle I laid down one end of a new spool of the thread and zig sag stitched over the top of it, being very careful to keep the thread in the middle of the stitch and not catch it with my sewing machine needle. I used the widest zigzag stitch I could.
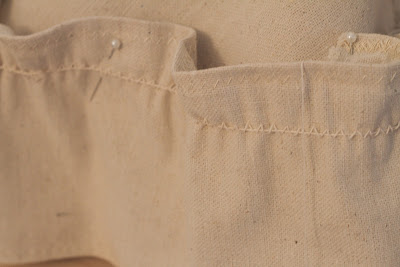
Ruffles made simple: zigzag over a thread, pull the straight thread to bunch up the ruffle | Candy Hearts & Paper Flowers
Zigzag over a thread, pull the straight thread to bunch up the ruffle


Once I was done I measured the fabric strip and using safety pins I pinned the fabric at 1/4, 1/2 and 3/4 the length of the fabric. Using the pins as guides I could make sure the fabric was somewhat evenly ruffled and make sure that my final length of the ruffle would match what I needed to sew around the tablecloth. So holding tight to the thread that you laid down in the middle, gently start pulling it and bunching the fabric up.

After it is uniformly bunched and the right length, use about 8 pins to roughly pin it to the tablecloth to check for length. If you are satisfied with the length, unpin the ruffle and sew the ends together. You should now have a big long ruffled ring of fabric. Now carefully measure and center the tablecloth in the center of the table and every 3-4" inches pin the ruffle to the table cloth so it will just skim the floor. (I pinned mine up on tv trays, it was easier to see the length.)
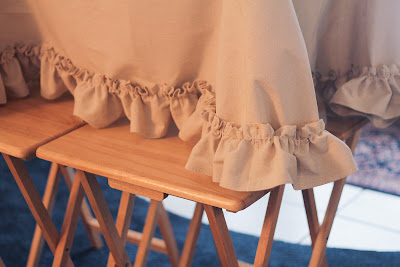
Pin the ruffle so it skims the floor; use a table or tray tables to bring it to eye level | Candy Hearts & Paper Flowers
All pinned on, waiting to sew

Once it is all pinned you are going to sew right in the center of the zigzag stitch you did earlier with a straight stitch.

You are done!

I had no idea what I was doing and figuring things out as I went along and it took me the better part of an afternoon and evening. I also have a 2 year old daughter that I was getting interrupted by fairly constantly. She didn't like that I was holding her table hostage! However she loves her pretty table! Now to make slipcovers for her little chairs, I bought a "Making slipcovers" DVD, time to break that out again.

Ruffled Tablecloth

We were given a child's table from my mother-in-law to use in Kirsten's bedroom.  It was once her play table when she was young. After years of be stored in the barn, the chrome has seen better days and the top is a bit beat up. It's a great vintage child's table and will be great just polished and cleaned up in a playroom in the rec room in the future.  For now though I'd like Kirsten to be able to use it in her bedroom, and it doesn't quite fit the aesthetics in her room.  So, I sewed a tablecloth that just skims the floor all around with a ruffle at the bottom.  Now I just have to make some little slipcovers for her chairs to match.  My husband is going to cut a piece of plexiglass to fit on top so she can use the table for art projects without mommy fretting too much. I'll put together a simple tutorial/how-to of my process.  I don't really know how to sew, so if I can do this, anyone can.  The ruffle was the hardest part since it was so long.


Here is the table before, a great little table, but it doesn't really fit in her room.

Weekend Sewing Projects

So, once I started sewing little things for our Iceland trip with the I-Spy bag I posted yesterday, I didn't really want to stop. I also picked up some alphabet beads when I was at Michael's and I used them to make an alphabet I-Spy bag as well.

I-Spy Bag

Alphabet I-Spy Bag

I'll be using this for letter recognition for now, then as she gets older she can use it for finding the alphabet, and when she is even older for finding words in the letters.  I put a little wrist strap on this one made of fold-over elastic (foe).  She carted it into the car with her this morning to take to school, so I consider that to be a success.  Nothing is supposed to go to school, but she wanted to keep it with her just for in the car.

Dolls Sleeping Bag and Quilted Pillow

I had stitched up a tiny bit of quilting 3x4 when I was like 16 for Girl Scouts.  I've held on to it in my little sewing basket for all these years.  This weekend I stitched it to a back and stuffed it to make a little pillow.  Then I stitched up a little sleeping bag with a sweet little ruffle for her dolly.  She was already in bed at this point so I put it on her chair for her to discover in the morning.

My daughter playing with her dolls new Sleeping Bag and Quilted Pillow
You should have seen her eyes!  They were so wide, she was so excited about this.  I have pictures, but she's just in underwear (potty training) so I don't want to put them online.  Here's a little close up of when she found them though.

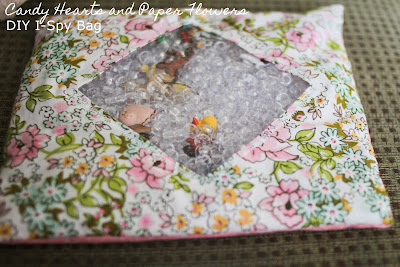
DIY I-Spy Bag

For our trip to Iceland I made an I-Spy bag for Kirsten. Sometimes they are also called Seek and Find bags or Peek-a-boo bags.  I used assorted image buttons from Michael's and a set of alphabet beads.  This is a picture heavy post, so click to see the entire step by step in pictures after the jump.  This was my first sewing project start to finish that I did all by myself, ever!  So be kind, please :)  My techniques may not be right at all, but if I can do this, anyone can! Click on any of the images for a much bigger view.

DIY I-Spy Bag